This page has the following device setting options:
- Manage wireless networks
- Image Options
- Storage & Cloud
- Motion and Sound detection
- Advanced settings
- Reset dbell

1. Manage wireless Networks
Manage wireless Networks page shows you information about the network connection to your dbell. If you would like to connect your dbell through Wi-Fi or would like to change your currently connected dbell to another (new) network, you can do that on this page.

Green highlight: This shows which Wifi network your dbell is currently connected to.
Signal Strength: This shows the signal strength of the connection at the dbells location.The signal strength is crucial for the dbell to function properly and is recommended to have above 75% for a proper connection. If the signal is below this number, consider adding a wifi extender to your network.
Security: The security type of your network (Do not change unless specified by a professional).
Channel: Network Channel (Do not change unless specified by a professional).
Password: This is where you enter your WiFi Password.
Wi-fi networks: This section allows you to change dbell's currently connected Network to another network or to select a network if your dbell is not connected to any wifi network.
2. Image Options
Image options page gives you the ability to change the settings regarding your picture quality when you view your camera. Here you can adjust brightness and quality to your liking.

Brightness slider lets you choose how bright or dim you would like your stream to be. Here is how to regulate it:
1. Press and hold the blue circle on the line.
2. Slide it to the right to make the setting brighter or to the left to make them more dim.
3. Let go of your finger.
4. Your settings will be automatically saved!
Contrast lets you choose a scale of difference between black and white on your image. If there was no contrast all the colours would blend together. To regulate it:
1. Press and hold the blue circle on the line.
2. Slide it to the right to make the setting more defined or to the left to make them less defined.
3. Let go of your finger.
4. Your settings will be automatically saved!
Streaming mode allows you to change the quality of the video stream. Select which mode you wish to have by simply pressing the button that indicates the mode you like. Blue background indicates the selected mode. HD mode has the best quality but highest lag time while fluent has the lowest quality but lowest lag time.
Reset, located at the bottom of the page, will reset all changes to the default starting settings. Simply press on reset for the changes to happen.
3. Storage & Cloud
Storage & Cloud page shows you details about your storage. It gives you information about your SD Memory card and other Cloud storage options.

Micro SD: The information provided to you is showing you how much memory is being taken up by videos and pictures, and how much memory is still left as free memory.
Settings: Leads you to the "Card Settings" page where all Memory card information is shown.
FTP: Allows you to "Link FTP" to your dbell
DropBox: Allows you to "Link Dropbox" to your dbell.
OneDrive: Allows you to "Link OneDrive" to your dbell
iCloud: Allows you to "Link iCloud" to your dbell
4. Motion & Sound Detection
Detectors: This section allows you to change the motion detection on or off, depending on your preference. If you'd like to be alerted whenever something is happening to the dbell outside, please visit this page.

Motion Detection: Turns on Motion detection on the dbell. This option will pick up any motion that occurs when the doorbell is online and will alert you depending on the settings that you have selected.
Motion Sensitivity: Regulates the sensitivity of the motion detection. Once you press on sensitivity, select what level you would like by pressing one of the areas illustrated. If you select the area closer to your doorbell, this means that motion detection will not pick up motion that's further away from the doorbell. This is especially useful if there is a busy road just outside of the doorbell or motion from trees or bushes.
Ring On Motion Detection: Sliding this option to turn it on will make sure that once any motion is detected, your app will start ringing, notifying you that there is someone or something outside your door.
Vibrate on motion detection: Sliding this option to turn it on will make sure that once any motion is detected, your phone will start to vibrate, alerting you that there is something or someone outside your door.
Show camera on motion: Sliding this option to turn it on will make sure that a video with the ability to slide and answer it will pop up upon motion detection. This is useful if you'd like to immediately make sure that you see what is happening outside.
Sound Detection: Turns on Sound detection on the dbell. This option will pick up any sound that occurs when the doorbell is online and will alert you depending on the settings that you have selected.
Sound Sensitivity: Regulates the sensitivity of the sound detection. Once you press on sensitivity, select what level you would like by pressing one of the areas illustrated. If you select the "low" option that's closes to the doorbell, this will make sure that only sounds that are close to the doorbell will be detected. If you have a quiet neighborhood, then you can increase this to a medium or high.
Ring on Sound Detection: Sliding this option to turn it on will make sure that once any sound is detected, your app will start ringing, notifying you that there is someone or something outside your door.
Vibrate on sound detection: Sliding this option to turn it on will make sure that once any sound is detected, your phone will start to vibrate, alerting you that there is something or someone outside your door.
Show camera on sound detection: Sliding this option to turn it on will make sure that a video with the ability to slide and answer it will pop up upon sound detection. This is useful if you'd like to immediately make sure that you see what is happening outside.
Save Motion & Sound parameters: Once you have selected your preferences above, press this button to save your changes.
5. Advanced Settings
ADVANCED SETTINGS Is a page of the app that has options that are not changed frequently. Usually this page will be used either by professionals only or to setup necessary settings for the first time.
To get to this page here are the steps:
1. Choose the dbell you'd like and press the "Setup" which is indicated by a gear symbol on the right side in the main menu page.
2. Select "Advanced Settings".
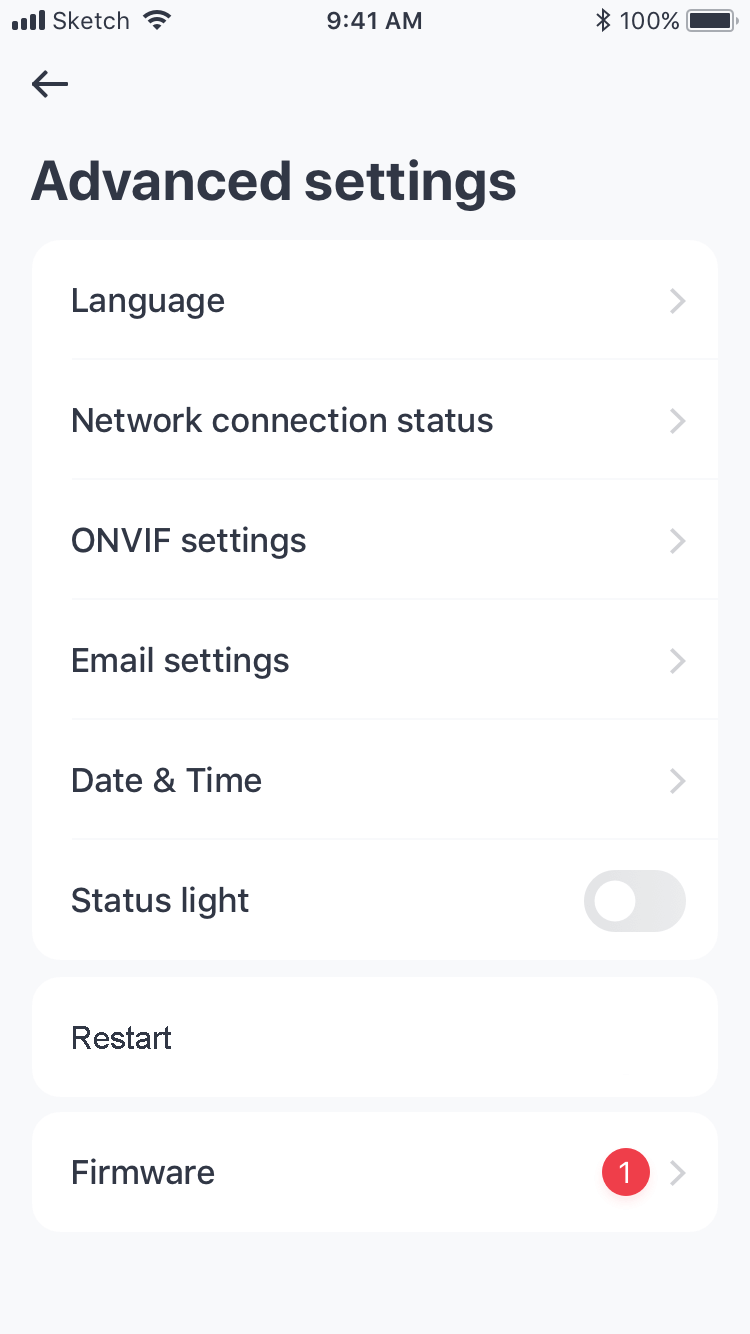
Language: dbell announces confirmation in the selected Language in setup mode. You may select other language for the announcement. Mute turns off the voice prompt along with the ring when you press the dbell button. Note this does not mute the "Chime" but only the video dbell.
Network Connection Status gives you specific information needed to connect your dbell in other ways such as a browser or an NVR system.
ONVIF Settings: Are for Network Video Recording systems (NVR) that allow you to record the stream 24/7.
Email Settings: This is the area where you would setup your email, in order to receive an image notification of someone pressing the doorbell. To do this, make sure that "Email Event Photo" is toggled ON. This will make sure that whenever an "event" such as motion detection is triggered, a snapshot picture will be taken and sent to the email you set up.
Date & Time: This section allows you to change the date and time that's displayed on the dbell stream. Whenever you take a video or picture, this time will be shown on the saved message. This could be important in criminal cases or for leisure, simply knowing when the recording happened.
Status Light: This is the heartbeat of the dbell. Blinking blue light simply means the dbell is on and internally functioning properly. You have the ability to turn this light off should you like to do so, by pressing the toggle on/off. To reach this toggle, open up "Settings" which looks like a "Gear" symbol.
Restart: Pressing on this option will restart the doorbell. This will not delete any existing information that you have on the doorbell.
Firmware: Firmware is a software that controls your dbell. Please make sure to always keep this up to date as we patch changes frequently.
6. Reset dbell
Reset: This will reset your doorbell to factory settings, erasing all previous information stored in the doorbell such as network, username and passwords.
Comments
0 comments
Please sign in to leave a comment.